How to Build a Small Covered Front Porch on a Tiny House (8×8 Step-by-Step Guide)
Learning how to build a small covered porch on a tiny house or shed conversion does more than boost curb appeal—it creates an essential mudroom transition, protects the entry door from rot, and expands usable living space.
However, building a deck onto a tiny home or manufactured cabin comes with a critical challenge: you cannot simply lag a heavy ledger directly into lightweight exterior wall studs without risking water intrusion and structural sagging.
In this field guide, I’ll walk you through how we framed and built an 8×8 covered front porch with a single-slope shed roof, engineered to stand solid with beefed-up 12-inch joist spacing, independent upright posts, and watertight roof-flashing.
Materials Needed to Build a Small Covered Porch on a Tiny House
- Porch Footprint: 8 ft. x 8 ft.
- Building Size: 12 ft. x 42 ft. Gambrel Tiny House
- Deck Framing: Pressure-treated 2×6 rim and floor joists (12″ on-center)
- Decking: 5/4 in. x 6 in. x 8 ft. treated deck boards (2″ star-drive screws)
- Support Posts: 14-ft. treated 4×4 posts (allowing for a continuous single-slope roof slant)
- Roof Rafters: 2×4 rafters cut to 9 ft. 6 in. (16″ on-center with hurricane ties)
- Roof Fall: 24 inches (2-foot fall over an 8-foot run)
- Roofing: 9 ft. 6 in. pre-cut corrugated metal roofing over 1×4 lathing
- Stair Opening: 42-inch rough width with pre-cut stringers
- Railing: 36-inch height, custom 2×4 frame with ripped 2×2 spindles (4″ code spacing)
- Screws: 2″ and 3″ star head deck screws
Step 1: Layout, Spacing, and Wall-Side Post Placement
When setting up next to a tiny house, avoiding direct metal-on-siding moisture traps is priority number one.
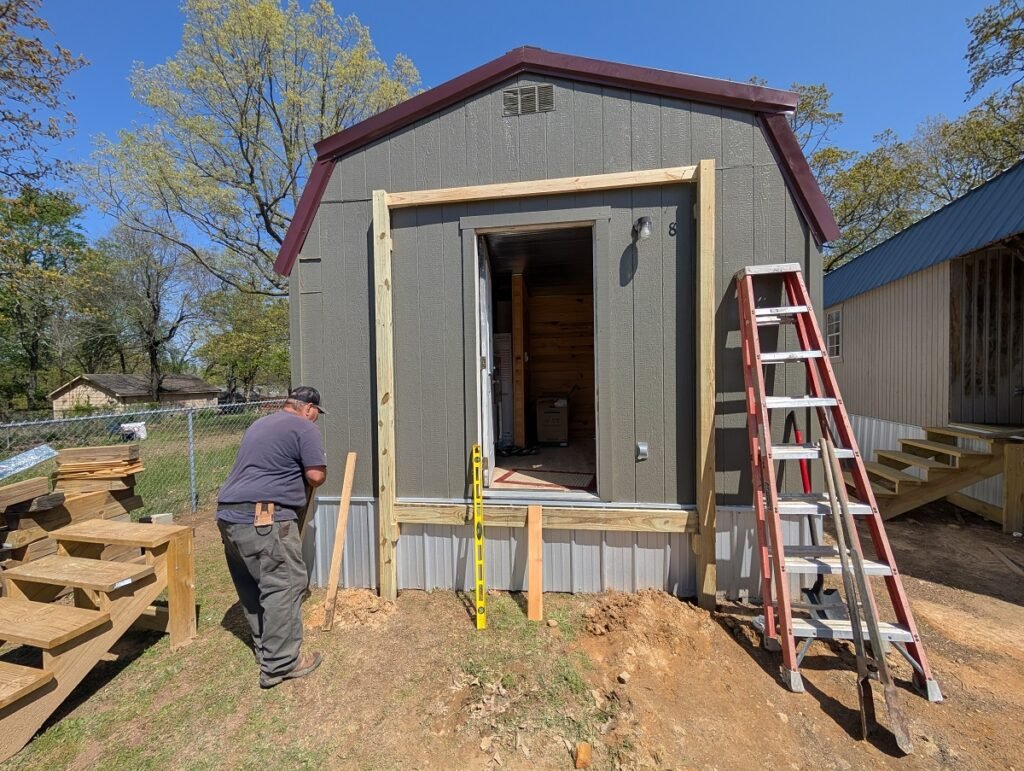
- Find Center: Measure across the front gable of the tiny house to locate dead center relative to the entry door, then pull measurements 4 feet out in both directions to establish your 8-foot footprint.
- Ground Marks & Wall Posts: Dig post locations along the ground. Set the two rear support posts against the house structure.
- The 1-Inch Air Gap: Rather than slapping the posts flat against the house siding, place treated 1×4 spacers between the posts and the exterior wall. This leaves a clean 1-inch air gap that allows rainwater to drain freely behind the framing, preventing rot and moisture buildup behind the siding.
- Rear Rim Attachment: Fasten your first treated 2x6x8 rim board across the posts to anchor the back of the deck frame. ( I used 3″ star head (Torx) deck screws for all framing)
Step 2: Squaring and Framing the 8×8 Box
A deck is only as good as its foundation square. Take the time to get the outer rim rigid before setting outside posts.
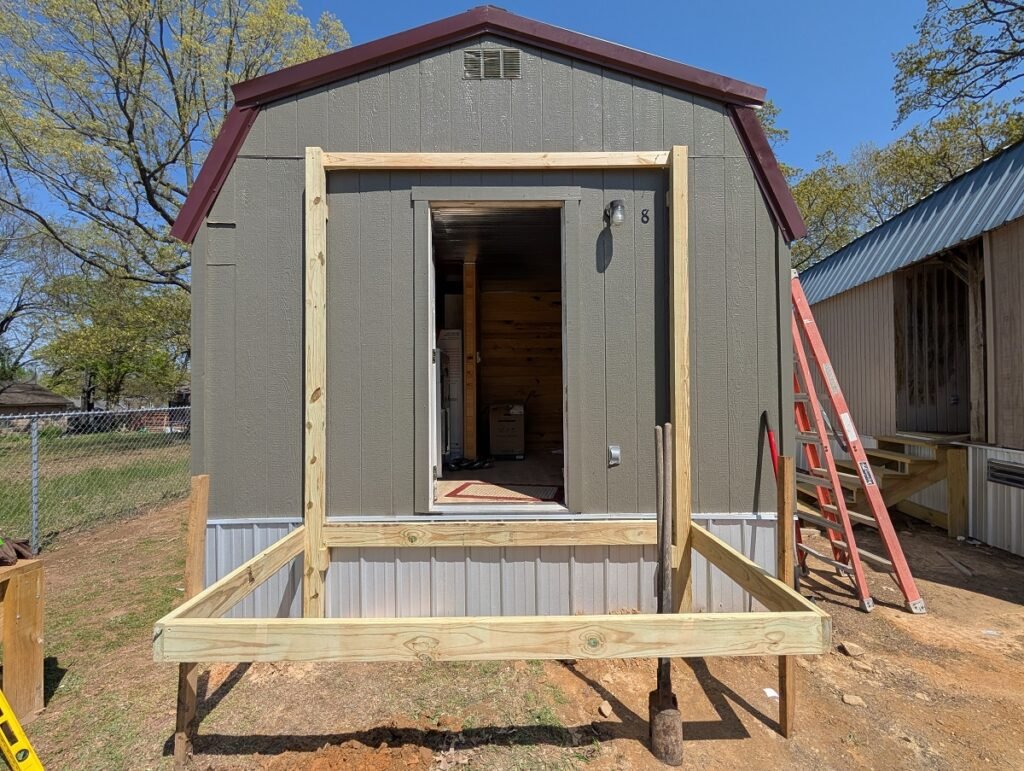
- Build the Rim Box: Run your 8-foot treated 2×6 edge boards out from both sides of the rear board. Using scrap 2×4 stakes and braces, level both sides, then attach the front 2x6x8 edge board to close the perimeter box.
- Check for Square: Pull diagonal measurements corner-to-corner across the 8×8 box. Adjust the corners until both diagonal tape readings match to the 1/16th of an inch.
- Tack and Hold: Once perfectly square, lock the frame in position with temporary ground kickers.
Step 3: Setting the 14-Foot 4×4 Posts
Because this design uses continuous vertical posts that run straight from the ground through the floor line up to the roof rafters, post length is critical.
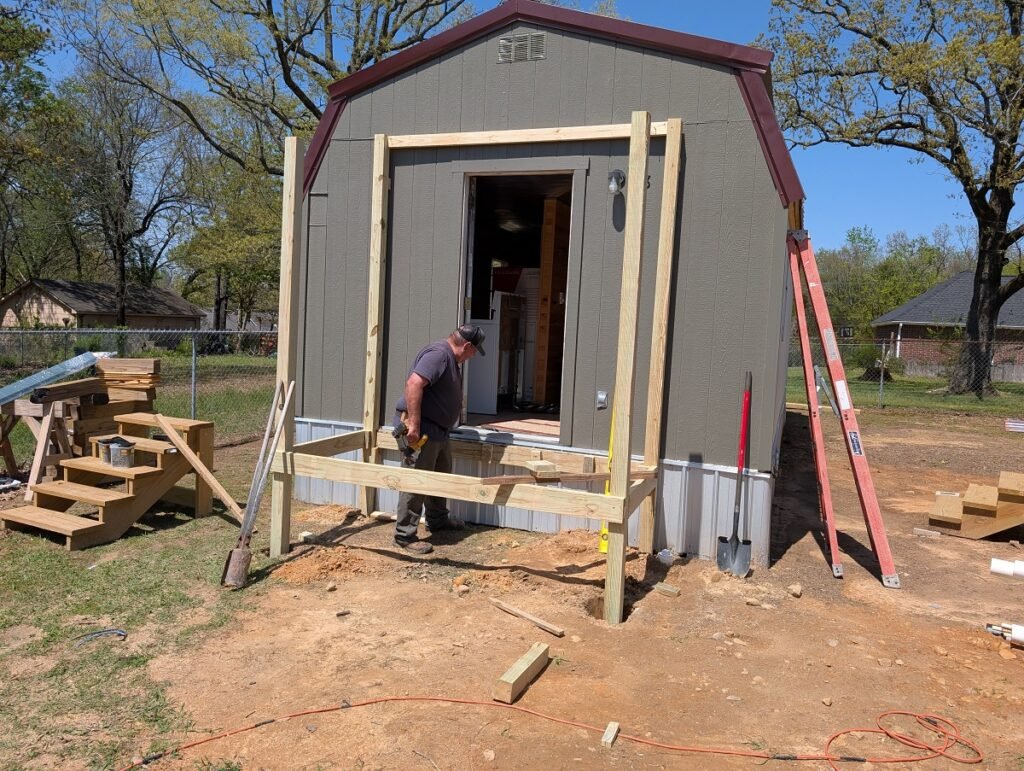
- Select 14-Foot 4x4s: Standard 8-foot or 10-foot posts won’t work here. Fourteen-foot treated 4x4s give you enough continuous height to handle ground depth, the deck framing elevation, and the tall wall side of the single-angle roof pitch.
- Outside & Stair Posts: Set your two front corner posts. Then, lay out your 42-inch stair opening and set two intermediate posts on either side of the stairway.
- Plumb and Secure: Use a 4-foot magnetic level to plumb each post in both directions, clamping them to the perimeter 2×6 box before driving structural framing screws.
Step 4: Beefed-Up 12-Inch Joist Spacing & Decking
Most residential deck codes allow 16-inch joist centers, but for a high-traffic rental or tiny house entrance that sees daily foot traffic and heavy boot gear, stiffening the subfloor prevents any trace of “deck bounce.”
- Mark 12″ Centers: Pull your tape across the rim joists and mark layout lines every 12 inches on center.
- Joist Hangers: Nail heavy-duty 2×6 joist hangers at every mark before sliding lumber in. Pre-hanging the metal brackets lets you drop joists right into place without fighting crowned boards.
- Drop and Fasten: Drop in your treated 2×6 joists flush with the top of the rim and fasten them off with approved structural screws.
- Install 5/4 Deck Boards: Lay 5/4 in. x 6 in. x 8 ft. rounded-edge treated deck boards across the frame. Fasten each board with two 2-inch star-drive (Torx) deck screws per joist crossing. The star-drive heads won’t cam out or strip like Phillips screws, and 5/4 boards provide long-term stability without curling.
Step 5: Framing the Single-Angle Shed Roof (2-Foot Fall)
A single-pitch shed roof shedding water away from the tiny house door is the cleanest, most maintenance-free design for small cabins.
- Set the 2-Foot Pitch: Over an 8-foot span, frame in a 24-inch (2-foot) elevation drop from the house wall down to the front post beam. This gives plenty of slope to shed driving rains and heavy snow load.
- Perimeter Top Band: Fasten a treated 2×4 band around the top of the 4×4 posts at rafter height, double-checking your front-to-back elevation marks to ensure the fall is exact.
- 9’6″ Rafters with Overhang: Cut your 2×4 roof rafters to 9 feet 6 inches. This gives you an 18-inch front overhang that throws rainwater well past the edge of the deck and protects anyone climbing the front steps.
- Hurricane Ties: Space rafters at 16 inches on center and lock every rafter down to the top beam using metal hurricane ties on both ends to resist high wind lift.
- 1×4 Lathing: Run treated 1×4 lathing horizontally every 2 feet across the tops of the rafters to act as a solid fastening grid for the metal roof panels.
Step 6: Metal Roofing & Watertight Siding Flashing
Water intrusion at the house-to-roof transition ruins more cabin remodels than termites. Here is how to lock down that seam permanently:
- Pre-Cut Metal Panels: Order pre-cut 9 ft. 6 in. ribbed metal roofing panels to match your rafter length. Screw them into the 1×4 lathing using 1-inch galvanized metal-to-wood screws equipped with neoprene EPDM sealing washers.
- Cutting the Siding Relief Groove: Never fasten flashing flat on top of exterior siding. Using a circular saw set to shallow depth or an oscillating multi-tool, cut a clean horizontal groove across the tiny house siding face just above the roof plane. Make the slot slightly wider than your flashing flange to give yourself working room.
- Slip the Flashing Up: Pull out a couple of siding nails along that seam to relieve tension. Slide the top vertical lip of the custom metal headwall flashing up underneath the house siding, allowing the bottom pan of the flashing to kick out cleanly over the top ribs of the metal roofing.
- Silicone Seal: Run a continuous bead of exterior 100% silicone sealant deep into the relief kerf before driving screws, creating a commercial-grade, two-stage weather barrier.
- Rake Trim: Finish the outer exposed sides of the roof with matching metal rake corner trim to keep wind and hornets out of the rafter bays.
Step 7: Steps, Custom Railing, and Spindle Installation
With the roof tight and dry, finish out the deck safety framing.
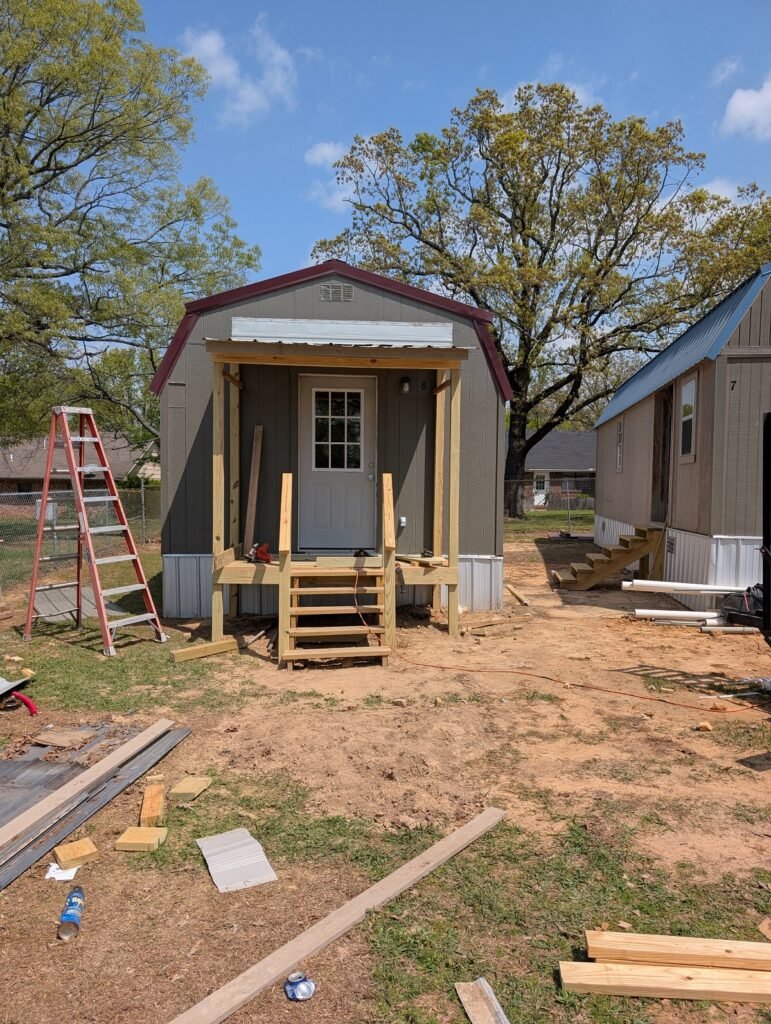
- Pre-Cut Stair Stringers: Anchor pre-cut stringer steps into the 42-inch opening between your front center posts, leveling the landing tread flush with the 5/4 decking. Level and Fasten to the deck frame with screws.
- The 36-Inch Handrail Spacer Trick: Standard residential building code calls for a 36-inch top railing height. To make installation fast and perfectly uniform:
- Cut 3-inch treated 2×4 blocking blocks.
- Screw a block into the post at the 36-inch mark to act as a positive stop for the top rail.
- Screw another 3-inch block at the bottom of the post (3 inches off the deck floor) to establish ground sweep clearance.
- Rip Custom Spindles on the Ground: To keep material costs down and match the framing, rip leftover treated 2x4s straight down the center to make 2×2 spindles.
- Jig and Assemble on the Ground: Build each railing section as a completed panel on the deck floor:
- Cut your top and bottom 2×4 runners to fit between the posts.
- Space your ripped spindles every 4 inches on center (ensuring a 4-inch sphere cannot pass through, meeting safety code).
- Leave each end of the railing section open so the top and bottom rails drop cleanly onto your pre-mounted 3-inch post blocks.
- Lock Down: Lift each finished section into place, rest it directly on the spacer blocks, and drive 3-inch exterior structural screws through the rails into the 4×4 posts.
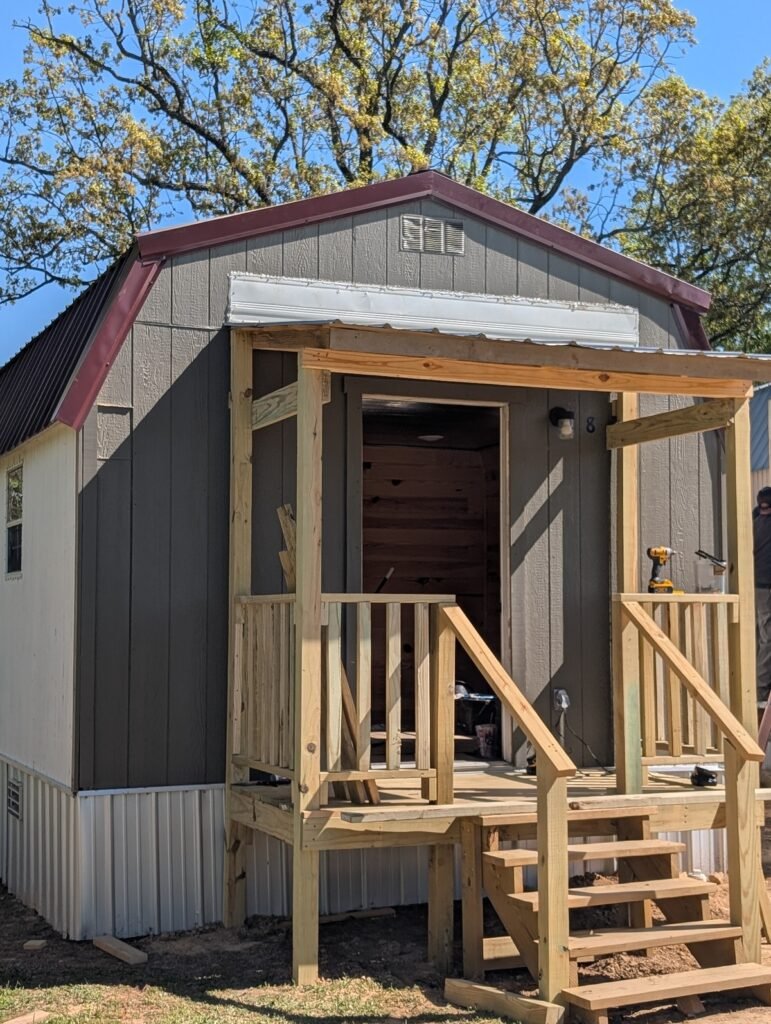
The Verdict: Built for Decades of Landlord Duty
By building the deck on continuous 14-foot 4×4 posts, standing 1 inch off the house siding, and running 12-inch joist centers, this 8×8 porch behaves as a rock-solid, standalone structure that never sags against the tiny house framing.
The 2-foot roof pitch easily diverts rainwater away from the foundation, and the 42-inch stair clearance ensures tenants can easily move furniture in and out without tearing up the railings.
Have a tiny home, cabin, or rental exterior build you’re tackling? Drop your questions in the comments below, or check out our full Plumbing and Fixtures Guide to keep your interior running just as smooth as your exterior.