
How to Fix Interior Doors: 3 Proven Field Fixes
Walk through any rental house right after the tenants hand the keys back, and you can practically bet on it. The bedroom door rubs the top corner of the jamb. The bathroom door requires a full shoulder shove just to get the latch bolt to click into the strike plate. Or worse, someone slammed a hollow-core door so hard the hinge screws ripped clean out of the soft pine framing.
Learning how to fix interior doors without tearing off trim or pulling your hair out is what keeps a turnover moving.
Homeowners usually run straight for a wood plane or an orbital sander the second a door starts sticking. That is almost always a mistake. Start hacking wood off the top rail or side stiles before diagnosing the hinge lines, and the second seasonal humidity drops in the winter, you’re left with an ugly, uneven 3/8-inch light gap and a door that still rattles in the frame.
Before you take a blade or sandpaper to anything, you need to diagnose where the frame shifted. Here are the three adjustments I make on-site to get interior doors swinging clean and latching tight on the first pass.
Essential Tools for How to Fix Interior Doors
You don’t need a woodworking shop. When I pull up to a unit, I grab this out of my truck:
- Cordless Impact Driver & Drill: With standard Phillips and T25 Torx bits.
- 3-Inch Coarse-Thread Wood Screws: Standard drywall or construction screws. The secret weapon for sagging jambs.
- Wooden Golf Tees or Hardwood Toothpicks: To pack stripped screw holes.
- Wood Glue (Titebond II): For anchoring the wooden plugs.
- Sharp Utility Knife & Wood Chisel (3/4-inch): For clearing hinge pockets or setting plates flush.
- Hand Planer or Block Plane: Only as a last resort when the house foundation itself has out-settled the frame.
- Lipstick or a Dry-Erase Marker: To diagnose latch strike alignment in five seconds flat.
Adjustment 1: The Top Hinge Sag (Fixing Dragging Heads & Floor Scrapes)
NWhen figuring out how to fix interior doors that scrape the floor carpet or bind against the top corner of the frame, the problem is rarely swollen wood. The top hinge is just pulling out.
Builders hang pre-hung interior doors with factory 3/4-inch screws. Those stubby little screws barely bite through the soft 5/8-inch pine jamb. They don’t even touch the structural 2×4 king stud buried behind the drywall. Over five years of kids hanging on doorknobs, that top hinge pulls away from the wall by 1/8 of an inch. That tiny 1/8-inch tilt at the top hinge translates to a 1/2-inch sag out at the latch side.
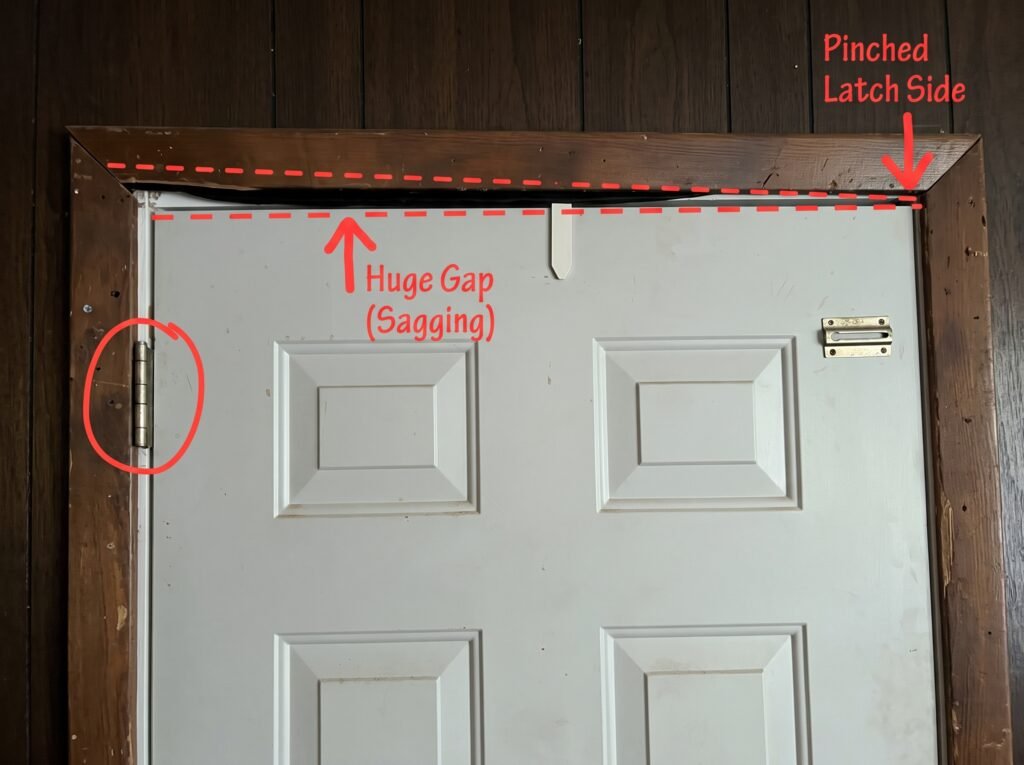
While hollow-core interior doors are lighter, the physics are identical to the heavy exterior door shown below. In fact, exterior units fail first because of the slab weight. Notice that severe reveal drop along the head jamb—wide open over the top hinge and pinched dead tight on the latch side. That identical tilt happens on bedroom and bathroom doors when kids hang on knobs or factory screws give out.
The Trade Fix:
- Open the door wide and kick a wooden shim or the toe of your work boot underneath the bottom edge to take the weight off.
- Back out the center screw from the hinge leaf secured to the jamb (not the door slab).
- Throw that useless 3/4-inch factory screw into your scrap bucket.
- Drive a 3-inch wood screw straight through that center hole.
- Run your driver slow. As the threads bridge the gap between the pine jamb and the rough framing stud behind it, the screw will bite into solid 2×4 lumber.
- Watch the top corner of the jamb pull back toward the framing. That single screw draws the entire door slab up and back, instantly restoring your top clearance reveal without shaving off a shaving of wood.
Adjustment 2: Packing Stripped Hinge Screws (The Golf Tee Trick)
If someone yanked on the door or the screws are spinning freely without biting, you can’t just shove a bigger screw into rotten pine fibers.
Part of knowing how to fix interior doors properly is understanding that putty has zero shear strength, and plastic drywall plugs will slip right out under the weight of a swinging slab. Don’t do that. Putty has zero structural shear strength, and plastic drywall plugs slip out under the weight of a swinging door.
The Trade Fix:
- Pull the hinge pin and take the door slab completely down. Set it against the wall.
- Back out all the spinning screws from the wall jamb.
- Grab two or three round wooden toothpicks—or even better, a wooden golf tee. Coat it in a little wood glue.
- Jam the tee or toothpicks straight into the stripped screw hole until it wedges dead tight.
- Snap off the excess wood flush with the face of the hinge pocket using your utility knife or chisel.
- Set your hinge back into the mortise pocket and drive your screws straight into that dense hardwood plug. The threads grab the new wood fibers, expand them against the old hole walls, and lock down tighter than the original factory frame ever was.
Adjustment 3: The Latch Won’t Catch (The Lipstick Diagnostic)
Another common headache when learning how to fix interior doors during a turnover is a latch bolt that refuses to drop into the strike plate without a shoulder shove. You pull the door shut, hear the metal scrape, but the latch bolt refuses to drop into the hole unless you lean into it with your hip.
When you run across a latch that misses the strike plate, don’t guess where it’s binding. And whatever you do, don’t start gouging the jamb with a chisel before you know the exact point of impact.
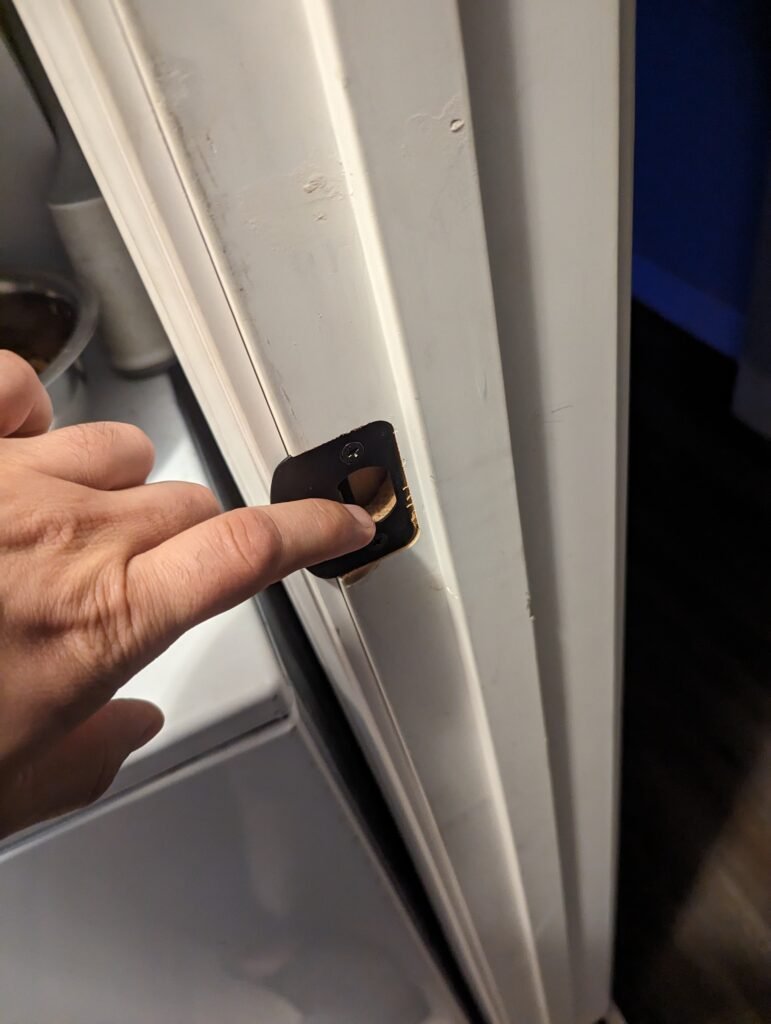
Whether you are dealing with a heavy exterior entryway or a lightweight bedroom privacy latch, the diagnostic step is the same. Test the strike plate opening with your thumb or a pencil before touching the jamb with a chisel. If the latch bolt is binding against the flat metal lip, no amount of handle jiggling will get it to seat.
The Trade Fix:
- Retract the doorknob latch and dab a little red lipstick (or a heavy stroke of dry-erase marker) directly onto the rounded tip of the spring latch bolt.
- Turn the knob, close the door gently against the frame, and let the latch pop out against the metal strike plate.
- Open the door and look at the mark left behind on the brass or nickel plate.
- That mark tells the whole story:
- If the mark is high or low: The latch bolt is hitting the top or bottom flat edge of the strike plate hole. Take a small metal bastard file and file down the inside lip of the strike plate where the paint mark landed until the bolt snaps free.
- If the door rattles when closed: The latch is dropping in, but the door has play against the rubber weatherstop. Take a flathead screwdriver, slide it into the little adjustment tab inside the strike plate opening, and pry that metal tab slightly outward toward the room. That pulls the closed door tighter against the doorstop and kills the rattle immediately.
The Last Resort: When You Actually Have to Plane Wood
If you follow the standard rules for how to fix interior doors with 3-inch framing screws and the slab still rubs due to an uneven foundation, only then do you break out the planer.
- Pull the hinge pins, take the door slab outside, and set it across a pair of sawhorses.
- Scribe a line along the rubbing edge using a pencil laid flat against the jamb to see exactly where the binding occurs.
- Take your hand plane or a sharp block plane and shave down the high spots with shallow passes, working from the outside corners inward so you don’t tear out the veneer on the corners.
- Always put a slight bevel (about 2 degrees) on the latch edge toward the stop molding. That bevel allows the leading edge of the door to clear the jamb easily without catching the frame as it swings through its arc.
Preventative Field Tip: Check Hardware While Doing Seasonal Maintenance
Whenever you do seasonal inspections around a house—like checking exterior seals or working through your checklist on how to winterize your home—take thirty seconds to grab the door handle on every interior room.
Give it a gentle tug. If you feel slack in the hinges, tighten that top center screw before the door pulls the pine jamb apart. A five-second turn with an impact driver today saves you from hanging a brand new pre-hung slab six months down the road.